Friday 26 January 2024

Time for a Parade

While the troops catch a bit of a breather I thought it might be a good time for a parade. First up the Boers.


The army totals 95 pieces. They are a mixture of Newline Designs, Jacklex, Raventhorpe Miniatures, Strelets and Scruby. They have all been painted by me except for the Scruby figures donated by Ross. There are:

4 x 13 Commandos (foot)
1 x 13 Commando (mounted)
2 x Field Guns
2 x Pom Poms
1 x Long Tom
1 x Wagon
2 x Command Stands

And now the Soldiers of the Queen...


The army totals 259 pieces. They are a mixture of Newline Designs, Jacklex and Raventhorpe Miniatures. They have all been painted by me except for the cavalry and the firing 'Guardsmen' painted by Matt G. There are:

6 x 27 Infantry Battalions
2 x 13 Half-Battalions
1 x 13 Lancers
4 x Field Guns
2 x Limbers
1 x 4.7" Naval Gun
2 x Maxim Guns
5 x Command Stands

Take a bow lads!


Tuesday 23 January 2024

Dannhauser - The Aftermath

The British lost a total of 45 figures during the battle which was quite a way under their break-point of 67. The losses to the Boers, whilst smaller, are probably more critical including the Long Tom and a Pom-Pom wiped out. The breakdown of casualties is given below:


I carried out die rolls for casualty recovery and then redistributed figures from disbanded units to other units as follows:

9 figures from the King's Liverpool were added to the Gloucesters and the remaining 6 to the Manchesters.
3 figures from the German Corps were added to the Boksburg Commando.

Having totted up all the VPs for both sides incredibly it stands at a draw of 15VPs each!

I hope to return to the campaign in the future but for the moment I will be taking a break. Thanks for your interest and all the comments as these really do help motivate me in a solo project like this.

GOD SAVE THE QUEEN!

Monday 22 January 2024

Battle of Dannhauser - Part 2


Turn 3 and the Boksburg Commando come under shrapnel fire for the first time. Their 'flee' test saw the maximum 6 figures take to their ponies and together with casualties this reduced them to break-point. One Commando down two more to go!
Heartened by events French pushes forward urging the Manchester's on.

Meanwhile White's command fails to activate for a third turn although they are taking a steady stream of casualties.

The two British Brigades that have managed to activate are gradually closing the distance with the Boer lines.

At the foot of the kopje the Manchester's come under heavy fire that forces them to stop and lie down.

Hamilton's Brigade are also out of steam and have ground to a halt.

But on the plus side the Naval Gun and British field artillery have knocked out both Long Tom and one of the pom-poms.

The Utretch Commando are reduced to break-point and withdraw. Two Commandos down and one to go.

Although reduced in strength Hamilton's men are hanging in there and delivering withering rifle fire back at the Boers.

The Black Watch have now passed through the prone ranks of the Manchester's and are within striking distance of the Boers atop the kopje.

A round of firing from the German Corps fails to inflict any PINs on the Black Watch.

And then it happens! The Commandant of the Pretoria Commando fails his 'fallen leader' test by rolling a 1. Because their Commandant is down the whole Commando must take a special morale test - another 1 will see them all flee, well you guessed it! Three Commando's down and a British victory.

As French's men were so close I couldn't resist playing the Melee phase of the next turn and a die roll of 6 meant a spectacular bayonet charge by the Black Watch cleared the kopje of the enemy.

A great victory for the British although you have to feel a bit sorry for the lads in White's command who failed five activation die rolls. 


Sunday 14 January 2024

Battle of Dannhauser - Part 1

I had some time this afternoon to play the first two turns of the game and it is shaping up to be a good one. Here's what's happened so far:

Hamilton and French both activated their brigades on turn one and moved forward allowing the supporting off-table regiments to come on. They immediately came under fire as the Boers let rip with everything they had.
White's own brigade failed to activate so could only stand where they were and take it.

The Gloucester's paid a heavy price for being the lead unit of Hamilton's brigade as the men fell under fire from rifles, artillery and the dreaded pom-pom's.

One bit of luck for the British - Long Tom fired at the 4.7" Naval gun rolling 10 dice needing a 5 or 6 to hit and not a single one was successful!

The Pretoria Commando on the kopje were able to fire over the heads of the Boksburg Burgers in the trenches below adding double the weight of fire on Hamilton's line.

Turn two and the British artillery zeroed in on Long Tom and some excellent shooting reduced the gun's strength to just 1SP - one more hit and it will be out of action.

White's men failed to activate again but at least they could shoot. Some good dice rolls plus supporting fire from the 18th Field Battery killed 2 Boers of the Utrecht Commando and forced 2 more to flee.

The Manchester's leading French's brigade were forced to check morale and the Major-General put himself at risk to stop them picking up a PIN marker. Fortunately he survived the Fallen Leader test.

The situation at the end of Turn 2. French and Hamilton are making progress but the casualties are starting to mount particularly in Hamilton's already depleted command.

I'll keep you posted on developments.

Tuesday 9 January 2024

Dannhauser - Scenario

The main reason behind playing out this solo campaign is to come up with a context for game scenarios that I would never normally dream up. As the campaign has progressed things have started to take a life of their own and all the events so far have been building towards this major clash between the two opposing main forces.

Winning this battle will be vital for either side. A win for the Boers could conceivably see them achieving a campaign victory, a win for the British will turn the tide and pull them back from the brink of defeat.

The Battle of Dannhauser - British on the left, Boers on the right. The town of Dannhauser is just off table behind the Boer right flank.
The British deployment. The King's Liverpool Regiment is off table behind the Gloucestershire Regiment. The Black Watch are off table behind the Manchester Regiment.

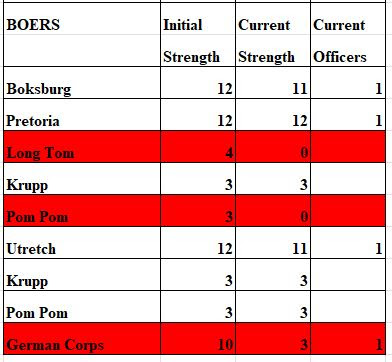
The Boer deployment. The Boers had a choice of units to field but some of the full-strength commandos had never been in action before. In the end I opted to field just one 'green' unit and the under-strength German Corps to help stiffen morale.

Special Rules

1. In order to commence advancing each British brigade commander must pass a command die roll. For White this is a 5 or 6 and for Hamilton and French a 3,4,5 or 6.
2. A further command die roll is made to see whether the regiments of each brigade are able to deploy in extended order (Hamilton's brigade will automatically deploy in extended order).
3. Hamilton's regiments will be classified as elite for this game as they have already taken part in two battles.
4. Hamilton's field officers will use the standard 'fallen officer' rule but as all other units have not seen combat yet they will +1 to all fallen officer die rolls.
5. The Boksburg commando has not been in action before and will be subject to the 'first time under shrapnel fire' morale rule.

The 5th Lancers finally make it on to the table.

Order of Battle

British
C-in-C Lieutenant-General Sir George White
5th Lancers
2nd Gordon Highlanders
18th Field Artillery
Maxim Gun
Naval Brigade Detachment
4.7" Naval Gun
Major-General John French
1st Manchester Regiment
1st Black Watch
42nd Field Artillery
Maxim Gun
Colonel Ian Hamilton
1st King's Liverpool Regiment (elite, strength 18 figures)
1st Gloucestershire Regiment (elite, strength 20 figures)
69th Field Artillery

Boers
C-in-C General Piet Joubert
Boksburg Commando (green)
Pretoria Commando
Long Tom
Krupp Field Gun
Pom Pom
General Lucas Meyer
Utrecht Commando
Krupp Field Gun
Pom Pom
General Johannes Kock
German Corps (strength 10 figures)

Long Tom is here, I'm already nervous...

Victory Conditions
To win the British must force three Boer commandos to flee. The British will lose if they receive over 67 casualties (50%).

Friday 29 December 2023

26 October 1899 - Turn 9

Orders

White's force at Glencoe will advance and attack the enemy at Dannhauser,
Yule will remain at Ladysmith.
Penn Symons will remain at Helpmakaar.

Joubert, Kock and Meyer will remain at Dannhauser.
De Wet and Botha will again attempt to attack Ladysmith but will now require a 5 or 6 die roll to succeed.

Movement

White rolls a 6 (which is a 3 hex move) and arrives at Hatting Spruit mid-morning. Full of enthusiasm, he orders an immediate attack on the Boers who have occupied two kopjes south of Dannhauser and to the east of the railway line.

Men of the Naval Detachment crossing the Ngobiya River at Hatting Spruit. Both sides will have their 'big guns' in the coming action.

De Wet rolls a 3 and fails to attack Ladysmith.

The situation at mid-morning on turn 9.


We will have a battle at Dannhauser!