Following the Battle of Graspan Methuen’s force continued to
advance along the railway line towards Kimberley. Very little was carried out
in the way of reconnaissance and even though Methuen himself reconnoitered the
crossing at Modder River, the British failed to spot that the Boers had a large
force dug in along both banks.
Fortunately for the British the loyalist station master at Modder
River managed to get a message over revealing the true strength of the Boers
although even then Methuen would not believe that their full force was present
and decided once again on a frontal attack.
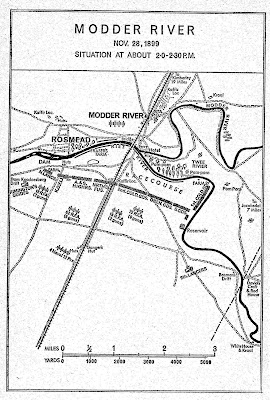
The Boers had indeed been “digging like rabbits” as the station
master reported and had created substantial trenches on either side of the
river line, the river itself was mostly fordable along its length. Furthermore,
General De Le Rey was now fully reinforced with Cronjie’s excellent Transvaal
Commandos to help shore up the wavering morale of the Orange Free State Boers and
the whole line was backed up by an impressive array of artillery and pom-pom
guns.
 |
| This is a map of the battle from my well thumbed copy of "Battles of the Boer War" bought from WH Smith in Bury St Edmunds in 1972. An excellent read. |
 |
| The table laid out and ready to play. As you can see I've had to adapt the battle area so it fits within the confines of my terrain unit system. The number of British units has also had to be slimmed down slightly but I'm happy that this will be a fairly decent representation of the battle. |
Special Rules
1. The British were unaware that the river turned
along their right flank although there was a crossing at Bosman’s Drift that
they never identified. Rule: At the start of the game the British role a D6 and
on a 5 or 6 discover Bosman’s Drift and are free to move troops across it.
2. The river could be crossed along
most of its length but could be easily crossed at the dam and the railway
bridge (even though this had been destroyed). Rule: Troops may feed across the
river at the dam and railway bridge 3 figures abreast. To cross elsewhere roll
1 x D6 crossing at half speed on a roll of 4, 5 or 6.
3. Cronjie’s men had high
morale having just come from the siege of Mafeking. Rule: Cronjie’s Commandos are
elite troops in this scenario.
4. In the actual battle the British suffered
demoralising casualties from their own artillery as they approached the river
line. Rule: If British troops are within 12” of the river 50% of fire from
their own artillery will fall on them and they will suffer the morale minus for
shrapnel.
5. In the actual battle Lord Methuen at one point led a bayonet
charge. Rule: each time a British unit charges roll 1 x D6 and on a 4, 5 or 6
Methuen will accompany them adding +1 to their melee score but also becoming
liable for the fallen officer test. This can only happen once in the game.
6. De
La Rey deliberately placed some of his Orange Free State commandos with the
river to their backs to stop them fleeing. Rule: Any Boer figures forced to
flee with the river to their back must make a further die roll and on a 5 or 6
they stay put.
Order of Battle
British C in C Lord Methuen
Guards
Brigade (Colville)
Coldstream Guards
Scots Guards
1 x Maxim
9th Brigade (Pole-Carew)
North Lancashire Regiment (half battalion)
Argyll and Sutherland
Highlanders
Northumberland Fusiliers
1 x Maxim Gun
3 x Batteries Royal Field
Artillery (62, 75 & 18 batteries)
Naval Battery
9th Lancers
Boers
C in C Commandant Koos de la Rey (Orange Free State)
Ross Commando
Newline Commando
General Cronjie (Transvaal)
Jacklex Commando
Kraaidorp Commando
2 x Field
Artillery
2 x Pom Pom
Victory Conditions
To win the British must force three of
the four Boers Commandos to flee by the end of Turn 12 or take the dam or
railway bridge and force two Commandos to flee. The Boers win if they can
reduce the British force to below 50% strength.


I do like your special rules to add some scenario/history specific aspects to the game. That said, the Imperial infantry looked lke they're lined up in a shooting gallery.
ReplyDeleteYou make the Boer War so tempting - I've long fancied it for a Pony Wars variant whereby the Brits must evacuate and burn the Boer farms rather than rescue farmsteads from the hostiles in the standard Pony Wars game. It has the advantage that the large number of 'Indians' are replaced by much smaller numbers of Boers.
The appeal for me is these early war battles before the guerilla stage and although it looks as if the British will get thrashed you can never quite tell as one failure in Boer morale can swing things!
DeleteA most excellent representation of the battle field Ian! Everything looks great! I look forward to seeing how things turn out!
ReplyDeleteThanks Brad, I hope to make a start at the weekend.
DeleteLooking good from here. Do like your scenario specific rules.
ReplyDeleteThey do add a bit of flavour particularly when playing solo as I do.
DeleteWell done on this set up IAN- just perfect! Look forward to the report.
ReplyDeleteThanks Kev. I’ll hopefully have the report up soon.
ReplyDeleteThis is great stuff. Here is a link to my Battle of Elandslaate https://www.flickr.com/photos/59568506@N02/albums/72157668505464355
ReplyDeleteA great looking game - I particularly like the station and buildings!
Delete