Showing posts with label Campaign Natal. Show all posts

Tuesday, 23 January 2024

Dannhauser - The Aftermath

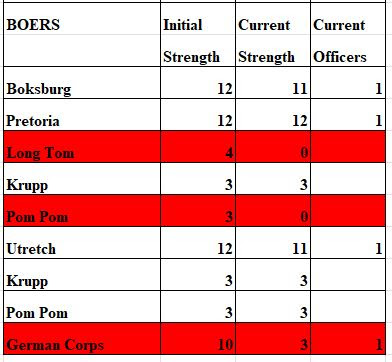
The British lost a total of 45 figures during the battle which was quite a way under their break-point of 67. The losses to the Boers, whilst smaller, are probably more critical including the Long Tom and a Pom-Pom wiped out. The breakdown of casualties is given below:


I carried out die rolls for casualty recovery and then redistributed figures from disbanded units to other units as follows:

9 figures from the King's Liverpool were added to the Gloucesters and the remaining 6 to the Manchesters.
3 figures from the German Corps were added to the Boksburg Commando.

Having totted up all the VPs for both sides incredibly it stands at a draw of 15VPs each!

I hope to return to the campaign in the future but for the moment I will be taking a break. Thanks for your interest and all the comments as these really do help motivate me in a solo project like this.

GOD SAVE THE QUEEN!

Monday, 22 January 2024

Battle of Dannhauser - Part 2


Turn 3 and the Boksburg Commando come under shrapnel fire for the first time. Their 'flee' test saw the maximum 6 figures take to their ponies and together with casualties this reduced them to break-point. One Commando down two more to go!
Heartened by events French pushes forward urging the Manchester's on.

Meanwhile White's command fails to activate for a third turn although they are taking a steady stream of casualties.

The two British Brigades that have managed to activate are gradually closing the distance with the Boer lines.

At the foot of the kopje the Manchester's come under heavy fire that forces them to stop and lie down.

Hamilton's Brigade are also out of steam and have ground to a halt.

But on the plus side the Naval Gun and British field artillery have knocked out both Long Tom and one of the pom-poms.

The Utretch Commando are reduced to break-point and withdraw. Two Commandos down and one to go.

Although reduced in strength Hamilton's men are hanging in there and delivering withering rifle fire back at the Boers.

The Black Watch have now passed through the prone ranks of the Manchester's and are within striking distance of the Boers atop the kopje.

A round of firing from the German Corps fails to inflict any PINs on the Black Watch.

And then it happens! The Commandant of the Pretoria Commando fails his 'fallen leader' test by rolling a 1. Because their Commandant is down the whole Commando must take a special morale test - another 1 will see them all flee, well you guessed it! Three Commando's down and a British victory.

As French's men were so close I couldn't resist playing the Melee phase of the next turn and a die roll of 6 meant a spectacular bayonet charge by the Black Watch cleared the kopje of the enemy.

A great victory for the British although you have to feel a bit sorry for the lads in White's command who failed five activation die rolls. 


Sunday, 14 January 2024

Battle of Dannhauser - Part 1

I had some time this afternoon to play the first two turns of the game and it is shaping up to be a good one. Here's what's happened so far:

Hamilton and French both activated their brigades on turn one and moved forward allowing the supporting off-table regiments to come on. They immediately came under fire as the Boers let rip with everything they had.
White's own brigade failed to activate so could only stand where they were and take it.

The Gloucester's paid a heavy price for being the lead unit of Hamilton's brigade as the men fell under fire from rifles, artillery and the dreaded pom-pom's.

One bit of luck for the British - Long Tom fired at the 4.7" Naval gun rolling 10 dice needing a 5 or 6 to hit and not a single one was successful!

The Pretoria Commando on the kopje were able to fire over the heads of the Boksburg Burgers in the trenches below adding double the weight of fire on Hamilton's line.

Turn two and the British artillery zeroed in on Long Tom and some excellent shooting reduced the gun's strength to just 1SP - one more hit and it will be out of action.

White's men failed to activate again but at least they could shoot. Some good dice rolls plus supporting fire from the 18th Field Battery killed 2 Boers of the Utrecht Commando and forced 2 more to flee.

The Manchester's leading French's brigade were forced to check morale and the Major-General put himself at risk to stop them picking up a PIN marker. Fortunately he survived the Fallen Leader test.

The situation at the end of Turn 2. French and Hamilton are making progress but the casualties are starting to mount particularly in Hamilton's already depleted command.

I'll keep you posted on developments.

Tuesday, 9 January 2024

Dannhauser - Scenario

The main reason behind playing out this solo campaign is to come up with a context for game scenarios that I would never normally dream up. As the campaign has progressed things have started to take a life of their own and all the events so far have been building towards this major clash between the two opposing main forces.

Winning this battle will be vital for either side. A win for the Boers could conceivably see them achieving a campaign victory, a win for the British will turn the tide and pull them back from the brink of defeat.

The Battle of Dannhauser - British on the left, Boers on the right. The town of Dannhauser is just off table behind the Boer right flank.
The British deployment. The King's Liverpool Regiment is off table behind the Gloucestershire Regiment. The Black Watch are off table behind the Manchester Regiment.

The Boer deployment. The Boers had a choice of units to field but some of the full-strength commandos had never been in action before. In the end I opted to field just one 'green' unit and the under-strength German Corps to help stiffen morale.

Special Rules

1. In order to commence advancing each British brigade commander must pass a command die roll. For White this is a 5 or 6 and for Hamilton and French a 3,4,5 or 6.
2. A further command die roll is made to see whether the regiments of each brigade are able to deploy in extended order (Hamilton's brigade will automatically deploy in extended order).
3. Hamilton's regiments will be classified as elite for this game as they have already taken part in two battles.
4. Hamilton's field officers will use the standard 'fallen officer' rule but as all other units have not seen combat yet they will +1 to all fallen officer die rolls.
5. The Boksburg commando has not been in action before and will be subject to the 'first time under shrapnel fire' morale rule.

The 5th Lancers finally make it on to the table.

Order of Battle

British
C-in-C Lieutenant-General Sir George White
5th Lancers
2nd Gordon Highlanders
18th Field Artillery
Maxim Gun
Naval Brigade Detachment
4.7" Naval Gun
Major-General John French
1st Manchester Regiment
1st Black Watch
42nd Field Artillery
Maxim Gun
Colonel Ian Hamilton
1st King's Liverpool Regiment (elite, strength 18 figures)
1st Gloucestershire Regiment (elite, strength 20 figures)
69th Field Artillery

Boers
C-in-C General Piet Joubert
Boksburg Commando (green)
Pretoria Commando
Long Tom
Krupp Field Gun
Pom Pom
General Lucas Meyer
Utrecht Commando
Krupp Field Gun
Pom Pom
General Johannes Kock
German Corps (strength 10 figures)

Long Tom is here, I'm already nervous...

Victory Conditions
To win the British must force three Boer commandos to flee. The British will lose if they receive over 67 casualties (50%).

Friday, 29 December 2023

26 October 1899 - Turn 9

Orders

White's force at Glencoe will advance and attack the enemy at Dannhauser,
Yule will remain at Ladysmith.
Penn Symons will remain at Helpmakaar.

Joubert, Kock and Meyer will remain at Dannhauser.
De Wet and Botha will again attempt to attack Ladysmith but will now require a 5 or 6 die roll to succeed.

Movement

White rolls a 6 (which is a 3 hex move) and arrives at Hatting Spruit mid-morning. Full of enthusiasm, he orders an immediate attack on the Boers who have occupied two kopjes south of Dannhauser and to the east of the railway line.

Men of the Naval Detachment crossing the Ngobiya River at Hatting Spruit. Both sides will have their 'big guns' in the coming action.

De Wet rolls a 3 and fails to attack Ladysmith.

The situation at mid-morning on turn 9.


We will have a battle at Dannhauser!

Saturday, 23 December 2023

25 October 1899 - Turn 8

Orders

White's force at Waschbank will advance and attack the enemy at Dannhauser.
Yule's Brigade will move to Ladysmith.
Penn Symons will remain at Helpmakaar.

Joubert, Kock and Meyer will remain at Dannhauser.
De Wet and Botha will again attempt an attack on Ladysmith but this time will need a 4,5 or 6 to be successful.

Movement

White rolls a 2 and advances to Glencoe.
Yule rolls a 3 and arrives at Ladysmith

De Wet rolls a 3 and fails to attack.

The situation at the end of turn 8.


The crisis at Ladysmith has hopefully passed although it should be noted that Yule only brings with him the understrength King's Royal Rifles and 53rd Field Artillery and the garrison will still be outnumbered by the Boers.

Thursday, 21 December 2023

24 October 1899 - Turn 7

Orders

White's force at Waschbank will advance to attack the enemy at Dannhauser.
Yule's Brigade will continue to move to Ladysmith
Penn Symons will remain at Helpmakaar

Joubert, Kock and Meyer will stand and entrench their position at Dannhauser.
De Wet and Botha are aware that the garrison at Ladysmith is weak and on a die roll of 3,4,5 or 6 will launch an attack otherwise they will remain in position.

Movement

White rolls a 1 and remains at Waschbank.
Yule rolls a 3 and moves to Modder Spruit.

De Wet rolls a 1 and fails to attack!

The situation at the end of turn 7.


A frustrating turn for both sides but with luck Yule will arrive at Ladysmith next turn to bolster the garrison.

Tuesday, 19 December 2023

23 October 1899 - Turn 6

Orders

White's force at Wessels Nek will advance to Waschbank and attack the enemy at Glencoe. Order of march will be: 5th Lancers, White's Brigade, French's Brigade, Hamilton's Brigade.
Yule's Brigade is to retire to Ladysmith and join the garrison there.
Penn Symons will remain at Helpmakaar.

Joubert, Kock & Meyer at Glencoe will react to the British advance on a D6 roll as follows:
1, 2 or 3 = Stand and fight at Glencoe
4 or 5 = Fall back to Hatting Spruit and stand and fight
6 = Fall back to Dannhauser dig in and stand and fight
De Wet & Botha continue to advance on Ladysmith

Movement

Joubert rolls a 6 and the Boer force falls back to Dannhauser.
De Wet & Botha move 2 hexes to hex 0909.

White's force moves 1 hex to Waschbank.
Yule's Brigade moves 1 hex to Elandslaagte

The situation at the end of Turn 6.

There is one contact this turn between De Wet & Botha and the garrison at Ladysmith however neither side takes any action at present.

Interestingly the Boers seem to be trying to lure White's force further away from Ladysmith whilst simultaneously threatening the town with De Wet and Botha.

Thursday, 14 December 2023

22 October 1899 - Turn 5

General White, pepped up by the recent Council of War, dashes off a series of orders to his subordinates instructing a concentration at Wessels Nek. I'm letting these orders go straight out without hinderance to reflect the current positivity at British H.Q.

Orders

General White - The troops at Ladysmith will advance along the line of the railway to the concentration point at  Wessels Nek. 1st Devonshire and 13th Field Artillery will remain behind as garrison. The Imperial Light Horse will return to join them.
General Yule (with Hamilton) - Your command will move to Wessels Nek to join the main force.
General French - Move to Wessels Nek to join the main force.
Penn Symons - Continue to hold Helpmakaar.

Joubert orders a local concentration of forces at Glencoe. Kock will fall directly back while Meyer retires via Biggarsberg Pass to join the main force at Glencoe via Dundee.
De Wet and Botha are to move to threaten Ladysmith.

General White leads his troops out of Ladysmith and forward towards Wessels Nek.

Movement
I'm allowing all British units to move 3 hexes this turn - God Save the Queen!

White, Yule, Hamilton & French all move to Wessels Nek
Chisholm (Imperial Light Horse) returns to Ladysmith

Joubert, Kock & Meyer are all at Glencoe
De Wet & Botha move to Van Reneen's Pass hex 0708

The position of the forces at the end of turn 5.


There are no contacts this turn.


Tuesday, 21 November 2023

Council of War

The victory at Biggarsberg is a relief for the British however it still leaves General White in a difficult position. Harrismith has fallen and now both Helpmakaar and Ladysmith are in danger if the Boers can concentrate their strength against one or the other.

These are the three options I believe the British now have:

1. Abandon Helpmakaar and concentrate all forces at Ladysmith in the hope that the Boers can be defeated in battle there.

2. Split the British forces between Ladysmith and Helpmakaar and hope that both places can hold out.

3. Hold both Ladysmith and Helpmakaar with token forces and push the main army north along the railway line with the aim of bringing about a decisive battle on favourable ground.

The Generals ride in for a council of war.

Normally I would roll a dice to decide which strategy should be adopted but I thought it would be an interesting idea to throw this out to the blog readers. Let me know in the comments which of the three courses of action you think General White should take. If there is no consensus after a week then I will resort to a die roll.

Friday, 10 November 2023

Biggarsberg - The Aftermath

The casualty recovery dice rolls turned out to be not as bad as I feared for the British although Yule's Maxim Gun was lost (my original recovery rules allowed for full recovery of British artillery but I decided to change this to make it the same as the Boers). The revised strengths of all the units involved are given below:


Following the battle I determined that the Boers would withdraw to hex 1407 and the British would advance to hex 1507.

Victory Conditions

As the campaign has developed I can see that the original victory conditions I set are a bit vague and it's unlikely either side could achieve them so I am reformulating them as follows:

The campaign progresses until one side has 20VP more than the other. VPs are awarded as below:

2VP for each enemy infantry unit permanently destroyed (1VP to the Boers for destroying the Lancers, Naval Brigade detachment or Imperial Light Horse)
1VP for each artillery battery, maxim gun or pom-pom destroyed (1 extra VP if the battery is the Long Tom or 4.7" Naval Gun).
1VP for each named commander who becomes a casualty
5VP for each battle won
5VP to the Boers for occupying Harrismith or Helpmakaar
1VP to the Boers for each turn they lay siege to Ladysmith
10VP to the Boers for occupying Ladysmith

On this basis the current VP totals are as follows:

British = 5VP
Boers = 13VP

The Boers are currently in the lead with +8VP

Tuesday, 7 November 2023

Biggarsberg Pass - The Game

The British column approaches the Biggarsberg Pass blissfully unaware that the Boers are waiting for them hidden in the hills.
The Boers are holding their fire waiting for the Tommies to come on.

The men of the Piet Retief Commando raise their rifles in anticipation.

On and on come the British...

...into the valley of death.

Turn 3 and finally the Boers let rip - 15 of the King's Royal Rifles are laid low!

The leading artillery and the King's Liverpool take a few hits too but not to the same degree.

Caught between the fire of the Piet Retief and Vryheid Commandos the head of the column ceases to exist.

But the remainder of the British force are able to deploy and begin to return fire.

The 'first time under shrapnel fire' rule causes 5 Boers of the Piet Retief Commando to flee whilst a sixth is knocked down. This is a lucky break for the British. 

A similar fate befalls the Vryheid Commando.

The British are still taking casualties but are not near their break point yet. 

The Piet Retief Commando withdraw from their exposed position (I diced to see whether they would remain in position or fall back as they were very near their break point) relieving the pressure on the British line. 

The Utrecht Commando (foreground) had so far only engaged in some long distance rifle fire.

Another hit on the Vryheid Commando was enough to see them take to their ponies and flee. If one more Boer Commando breaks the game will be over.

And yep, as the Piet Retief reach the hill they too are reduced (break point is 5 figures) by further British artillery fire.

Incredibly it's a British victory - I bet you didn't see that coming?

So Yule gets away by the skin of his teeth and the column is free to withdraw through the pass. His own brigade however has now been shattered leaving only Hamilton's as an effective fighting force.

Next I will calculate casualty recovery.