Thursday 1 December 2022

More Highlanders

After a herculean effort I have managed to complete a second Highlander unit for the British forces. Highlanders do look great, but painting tartan is something of a chore. They don’t represent a specific regiment and can stand in for any unit from the Highland Brigade depending on the scenario.

The figures are all by Jacklex* and this time I have used the 'flappy seagull' running figure which is one of my favourite poses in the range.

*A big shout out to Mark of Jacklex for his superb service and support for this project!

Thursday 22 September 2022

Stormberg - The Game

The sun is coming up and the Boers on the Kissieberg Kopje are keeping a sharp lookout.
So far however Gatacre's force has remained undetected.

On they come, still deployed in close columns following their night march.

The British artillery remains silent as they cannot make out any targets on the Kopje in the early morning light.

Turn 2 and the Mausers spring into action causing casualties in both British battalions. A low morale throw has also resulted in an early PIN for the Royal Irish Rifles.

Further bad news for Gatacre - the Grobelaar Commando appears on Steynsberg Kopje directly in the British rear.
The dismounted MI turn to face the new threat and try to protect the guns.

While the infantry shake out into a battle line (although the Royal Irish Rifles are hampered in this due to having now accumulated 2 PINs).

However, an artillery hit on the Ollivier Commando forces a morale test that sees 3 Boers take to their ponies and flee (they rolled a 1).

Meanwhile the Northumberland Fusiliers are making steady progress towards the Kissieberg Kopje.

Gatacre tries to steady the Royal Irish Rifles but it was proving hard to rally off those PIN markers.

Turn 4 and another Boer morale die roll of 1 sees the unsupported Grobelaar Commando taking to their ponies and riding off en-masse. This was an unbelievable stroke of luck for the British!
The Northumberland Fusiliers have made it to the base of the Kissieberg Kopje and the lack of PIN markers puts them in a great position to make a charge.

The Royal Irish Fusiliers are now too far behind the Northumberlands to lend any support.
With their infantry so close to the enemy the British artillery ceases fire.
The Northumberland Fusiliers charge the Boers and force the whole Commando to fall back.
This was technically a win for the British but I decided to play one more turn to allow a second charge.
This time General Ollivier and his Commando were completely overrun and eliminated.
Not such a Black Week after all!

Another roller-coaster of a game with some lucky die rolls for the British resulting in a surprising result. It was enjoyable to play proving that a smaller game can be just as much fun as one that uses all my units.

The next game will be Magersfontein but as I need to find time to paint another Highland unit this one may be a way off yet.

Friday 16 September 2022

Stormberg – Scenario

While Methuen conducted operations in the west and Buller personally supervised those in the east, it fell to the veteran of Omdurman General Sir William Gatacre to hold the central position in eastern Cape Colony. Gatacre was tasked with preventing the Boers moving any further south than the positions they held at Stormberg.

Gatacre was a highly respected and capable officer but the force he was allocated was woefully inadequate for offensive operations, yet he received contradictory instructions from both Cape Town and Buller which whilst saying he “had a free hand to act” made it clear they expected him to attack.

So it was that on the evening of 9th December 1899 Gatacre took his meagre force forward with the aim of expelling the Boers from the Kissieberg Kopje and forcing them to abandon Stormberg. Marching by night and having only inaccurate sketch maps he ended up coming against the Boer positions from the wrong direction although fortunately for him the Boers were as surprised as he was.

This scenario aims to recreate the resulting assault by the British on 10 December that was to mark the beginning of Black Week in 1899.


Special Rules

1. The British battalions begin the game in column and do not deploy to line until fired upon. Once deployed they remain in close order. The Boers were surprised by the British line of approach and did not open fire until they were very close. Rule: The Boers must attempt to spot the British each turn on die roll of 4, 5 or 6 (they are automatically spotted when within 18”).
2. During the battle Boers occupied the Steynsburg Kopje where they brought fire to bear on the British rear. Rule: at the start of turn 2 Boers roll 1x D6, the Boers appear on the Steynsburg on a 5 or 6 (continue rolling each turn adding one to the die roll every time). The Boer troops are not permitted to move off the Steynsburg Kopje.
3. The British force attacked in a different location to the one chosen by Gatacre in an area that was almost a sheer cliff making the attack hard going. Rule: to represent this, British troops must -1 from all melee die rolls.
4. Once again, the British suffered casualties from their own artillery as they could not clearly spot the progress of the infantry. Rule: if the artillery is firing on Boers within 12” of any British infantry then split the firing dice 50:50 into two colours – white will be hits on the Boers and blue on the British.
5. The Mounted Infantry were tasked with protecting the guns and did not take part in the attack. Rule: The Mounted Infantry must remain with the guns. They may turn to fire at any Boers that appear on Steynsburg Kopjie.

Order of Battle

British C-in-C General Gatacre 
2nd Northumberland Fusiliers
2nd Royal Irish Rifles
Mounted Infantry (half-battalion dismounted) protecting guns
74 & 77 RFA

Boers C-in-C General Ollivier 
Ollivier Commando (reinforced to 15 figures)
Grobelaar Commando (on Steynsburg)

Victory Conditions

To win the British must occupy the Kissieberg Kopje within 8 turns.


Monday 12 September 2022

Stormberg

Lieutenant-General Sir William Forbes Gatacre is leading two battalions of infantry on a night march against the Boer positions on Kissieberg Kopje.

"Blimey sarge why does ole' back-acher always ave' us marching around in the pitch black?"
"Less of your lip there private. General Gatacre got us through many a tight spot in the Sudan by is' night marches, ee' knows what ees' doin'".
"General, I'm not sure if we're on the right track, the railway shouldn't be there on our left should it?"
"Ahem Colonel, we may be a point or two off compass but we'll catch the blighters off guard as soon as the sun comes up!".

"Gettin' light now sarge, do you think the Boers know we're comin'?".
"Not a chance lad, not a chance!".

Dawn breaks on 10 December 1899 the beginning of what was soon to be known as ‘Black Week’.

Friday 3 June 2022

The Boer War Atlas

Having just marked a significant birthday (the one where the government start to pay you for doing nothing) I was pleased to receive, among other things, a copy of Chris Ash’s magnificent The Boer War Atlas.

A lavish production (hardback 36cm x 30cm) and absolutely worth the cover price.

I’m more than impressed by the scope and detail in this book with over 100 excellent maps meticulously drawn by the author showing both strategic movements and battle deployments. For a wargamer it is a treasure trove.

This is a detail from one of the Modder River maps - I wish I'd had the book when I was drawing up my game scenario!

The author has been careful to devote half the book to the guerrilla phase of the war so apart from the main battles there are many other actions depicted I had never heard of and some much larger in scope than I had realised. There’s so much potential for devising scenarios that I’m really going to be spoilt for choice.

Tuesday 12 April 2022

Modder River - The Game


Things got off to a good start for the British when a die roll of  5 allowed them to discover Bosman's Drift. Methuen immediately ordered Colville to send half of the Scots Guards, supported by a maxim and the 9th Lancers, on a flanking movement against the Boer left.
Watching from the far bank of the river, Cronjie noted the enemy manoeuvre and issued orders to extend his flank. This is one of the few times I have actually moved any Boer units in one of my games!

9th Brigade begins to advance and the Northumberland Fusiliers start taking casualties as they lie in direct line of sight of the Boer artillery.

De la Rey looks on as the British forces move forward on either side of the railway line. The Boer guns are laying down an effective fire with no retaliation as they have not yet been 'spotted'.

The view from behind the now extended left flank of the Boer force. The Jacklex Commando and a pom-pom open fire on the Scots Guard column as it deploys into line.

Colville leads the rest of the Guards Brigade forward. At this stage they have only lost one man and one officer so confidence is high.

The 4.7" gun 'Joe Chamberlain' gets into action having finally spotted the Boer guns. This gun didn't arrive in time to take part in the real battle but as I have no 12pdr Naval gun model it seemed only fair to include it in the OOB.
Ouch! The Northumberland Fusiliers receive a devastating barrage from the Boer artillery backed up by accurate Mauser fire. They are reduced to 9 figures and removed from play - and it's only the end of Turn 2.

The left of the British line has advanced as far as the farm opposite the dam crossing point. The half-battalion of the North Lancashire's have taken a couple of casualties as have the A&S Highlanders on their right but nothing to slow up either unit.

Opposite them, good shooting from the British artillery has caused some of the Ross Commando to flee with the Commandant himself amongst the casualties. There is a chance here for a successful charge if the A&S Highlanders can just get a bit closer.

On the other flank the Scots Guards detachment have deployed but the heavy casualties received means that they become the second British unit to be removed from play. However, the maxim gun and Lancers are about to deploy.

Back at the dam, the A&S Highlanders and the North Lancashire's advance to within charging distance of the Boer line but the latter take a 'pin' which will prevent them from charging next turn.

In the centre the Coldstream Guards have no pins so are able to fix bayonets and charge forward. The result is that half of the Kraaidorp Commando is destroyed and the rest take to their ponies.

At the same time the British artillery take out both the Boer guns - well done Joe!

And to top it all the A&S Highlanders led by Methuen himself see off the Jacklex Commando at the point of the bayonet. Methuen received a slight wound in the process and had to be taken to the rear but a complete victory was now within his grasp.

On the British far right the maxim was now bothering the Boers whilst the Lancers looked for an opportunity to use their pointy sticks - but it was not to be.

A further spirited charge by the Highlanders broke the Newline Commando. With three Commandos now destroyed a British victory was declared.

Somewhat demoralised the Boer army withdrew.

It was a brief game lasting only five turns which surprised me a bit and I think the main reason for the British success was that I allowed them to start in a position too close to the Boer front line. If I had deployed them 6" further back it would have allowed a further turn of Boer firing before any British troops were close enough to declare a charge. This would have kept the result more keenly balanced as the British were only 14 casualties short of their breakpoint when the game ended.

However, I should not detract from the great pluck and determination displayed by the British soldiers and the personal valour shown by their general-in-chief. I have never played a game where I had three successful charges so the Empress Queen will undoubtedly be justly proud of this great victory!

Tuesday 5 April 2022

Modder River - Scenario

Following the Battle of Graspan Methuen’s force continued to advance along the railway line towards Kimberley. Very little was carried out in the way of reconnaissance and even though Methuen himself reconnoitered the crossing at Modder River, the British failed to spot that the Boers had a large force dug in along both banks.

Fortunately for the British the loyalist station master at Modder River managed to get a message over revealing the true strength of the Boers although even then Methuen would not believe that their full force was present and decided once again on a frontal attack.

The Boers had indeed been “digging like rabbits” as the station master reported and had created substantial trenches on either side of the river line, the river itself was mostly fordable along its length. Furthermore, General De Le Rey was now fully reinforced with Cronjie’s excellent Transvaal Commandos to help shore up the wavering morale of the Orange Free State Boers and the whole line was backed up by an impressive array of artillery and pom-pom guns. 

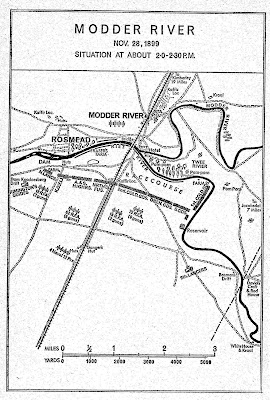
This is a map of the battle from my well thumbed copy of "Battles of the Boer War" bought from WH Smith in Bury St Edmunds in 1972. An excellent read.
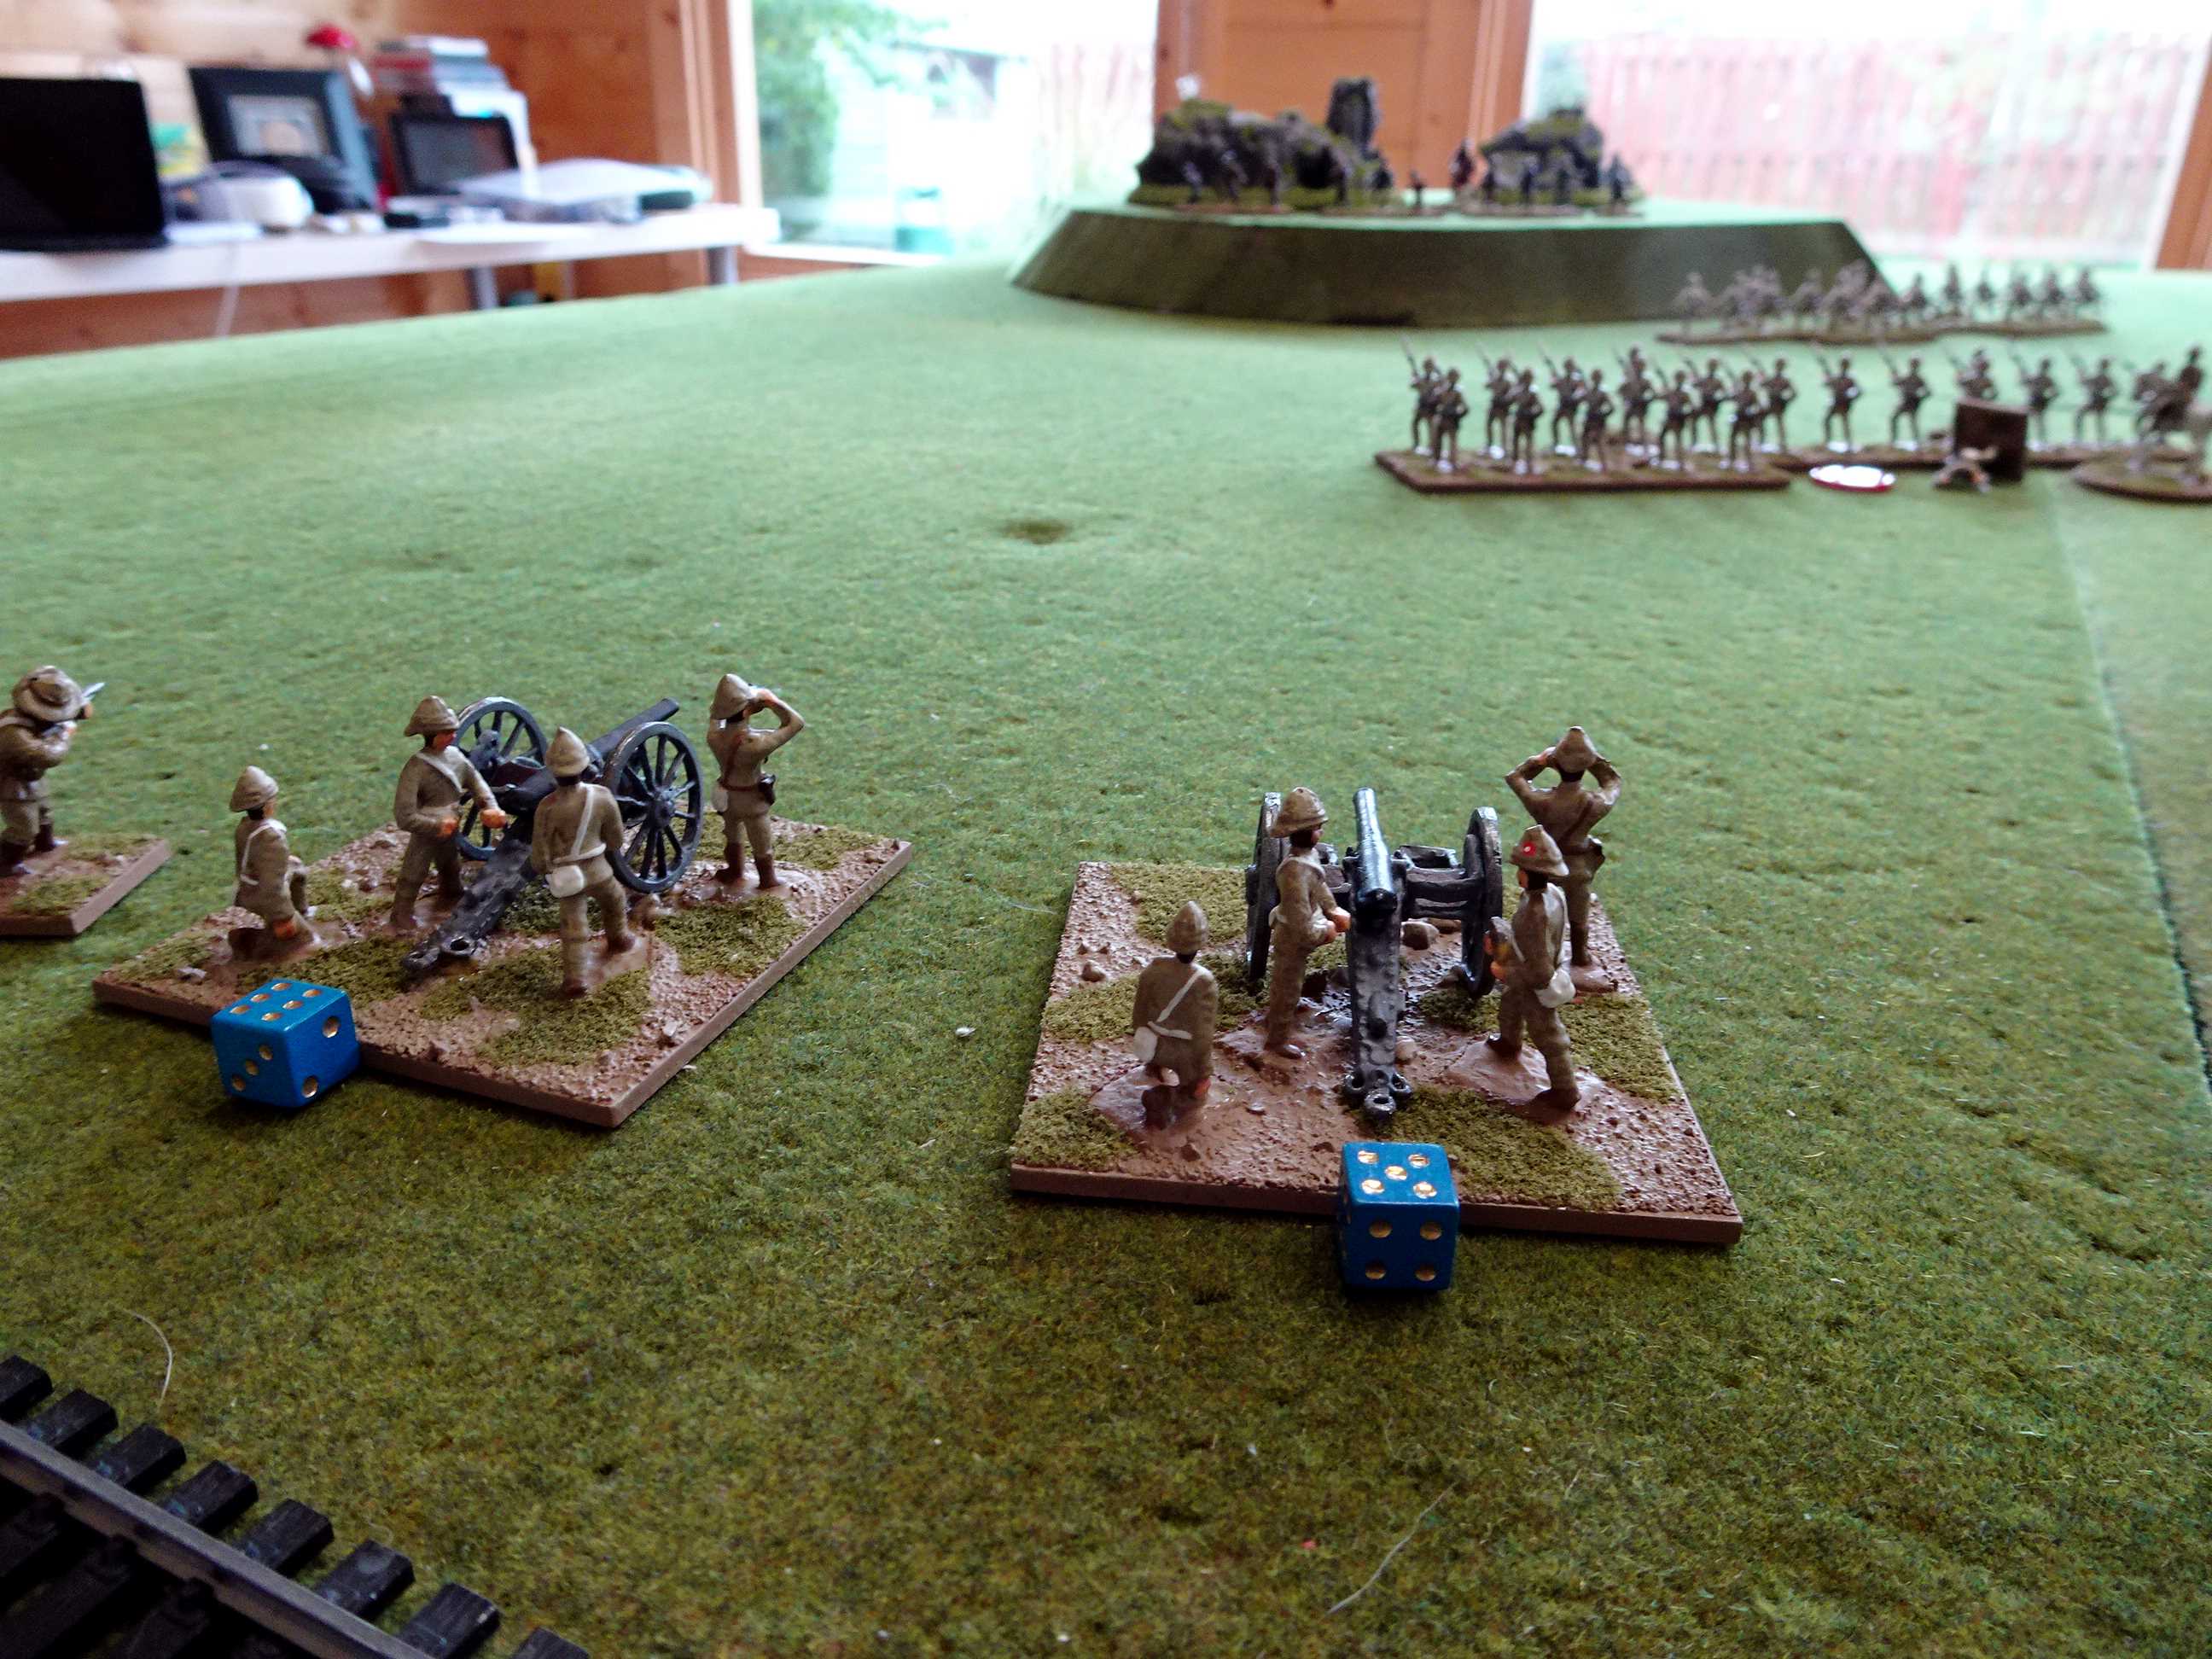
The table laid out and ready to play. As you can see I've had to adapt the battle area so it fits within the confines of my terrain unit system. The number of British units has also had to be slimmed down slightly but I'm happy that this will be a fairly decent representation of the battle.

Special Rules

1. The British were unaware that the river turned along their right flank although there was a crossing at Bosman’s Drift that they never identified. Rule: At the start of the game the British role a D6 and on a 5 or 6 discover Bosman’s Drift and are free to move troops across it.
2. The river could be crossed along most of its length but could be easily crossed at the dam and the railway bridge (even though this had been destroyed). Rule: Troops may feed across the river at the dam and railway bridge 3 figures abreast. To cross elsewhere roll 1 x D6 crossing at half speed on a roll of 4, 5 or 6.
3. Cronjie’s men had high morale having just come from the siege of Mafeking. Rule: Cronjie’s Commandos are elite troops in this scenario.
4. In the actual battle the British suffered demoralising casualties from their own artillery as they approached the river line. Rule: If British troops are within 12” of the river 50% of fire from their own artillery will fall on them and they will suffer the morale minus for shrapnel.
5. In the actual battle Lord Methuen at one point led a bayonet charge. Rule: each time a British unit charges roll 1 x D6 and on a 4, 5 or 6 Methuen will accompany them adding +1 to their melee score but also becoming liable for the fallen officer test. This can only happen once in the game.
6. De La Rey deliberately placed some of his Orange Free State commandos with the river to their backs to stop them fleeing. Rule: Any Boer figures forced to flee with the river to their back must make a further die roll and on a 5 or 6 they stay put.

Order of Battle

British C in C Lord Methuen
Guards Brigade (Colville)
Coldstream Guards
Scots Guards
1 x Maxim
9th Brigade (Pole-Carew)
North Lancashire Regiment (half battalion)
Argyll and Sutherland Highlanders
Northumberland Fusiliers
1 x Maxim Gun
3 x Batteries Royal Field Artillery (62, 75 & 18 batteries)
Naval Battery
9th Lancers

Boers C in C Commandant Koos de la Rey (Orange Free State)
Ross Commando
Newline Commando
General Cronjie (Transvaal)
Jacklex Commando
Kraaidorp Commando
2 x Field Artillery
2 x Pom Pom

Victory Conditions

To win the British must force three of the four Boers Commandos to flee by the end of Turn 12 or take the dam or railway bridge and force two Commandos to flee. The Boers win if they can reduce the British force to below 50% strength.

Saturday 2 April 2022

Modder River

It is dawn on the 28th of November 1899 and, having recovered from the hard fighting at Graspan, Lord Methuen's column is nearing the Modder River as they continue the advance to relieve Kimberley.

Colonel Colville is reporting to Lord Methuen.
"Sir, the Modder River is just ahead shall I order scouts forward?"
"No need Colville, I reconnoitered there personally yesterday and the crossing is not defended." 
"Perhaps so sir but it wouldn't hurt to send forward a troop of cavalry would it?"
"You worry too much Colville, the Boers will likely have headed to the high ground at Magersfontein, they wouldn't stand here against British troops on level ground!"

"Dig in lads and adjust your sights to 600yds, that's where we'll hit 'em!"

"Site those guns carefully so you can sweep the open ground if the Brits dare to advance!"

Next up the battle of Modder River.