Tuesday 21 November 2023

Council of War

The victory at Biggarsberg is a relief for the British however it still leaves General White in a difficult position. Harrismith has fallen and now both Helpmakaar and Ladysmith are in danger if the Boers can concentrate their strength against one or the other.

These are the three options I believe the British now have:

1. Abandon Helpmakaar and concentrate all forces at Ladysmith in the hope that the Boers can be defeated in battle there.

2. Split the British forces between Ladysmith and Helpmakaar and hope that both places can hold out.

3. Hold both Ladysmith and Helpmakaar with token forces and push the main army north along the railway line with the aim of bringing about a decisive battle on favourable ground.
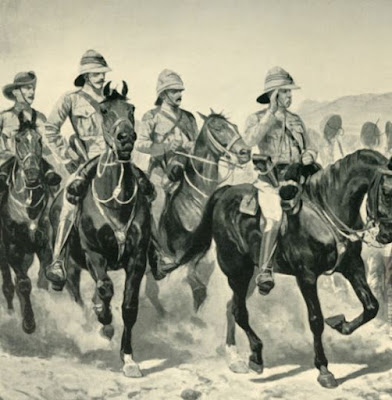
The Generals ride in for a council of war.

Normally I would roll a dice to decide which strategy should be adopted but I thought it would be an interesting idea to throw this out to the blog readers. Let me know in the comments which of the three courses of action you think General White should take. If there is no consensus after a week then I will resort to a die roll.

Friday 10 November 2023

Biggarsberg - The Aftermath

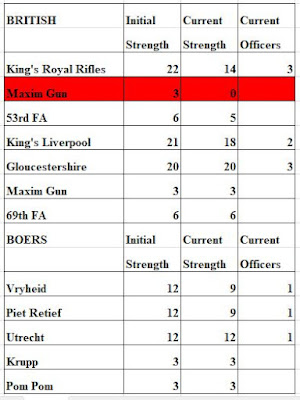
The casualty recovery dice rolls turned out to be not as bad as I feared for the British although Yule's Maxim Gun was lost (my original recovery rules allowed for full recovery of British artillery but I decided to change this to make it the same as the Boers). The revised strengths of all the units involved are given below:


Following the battle I determined that the Boers would withdraw to hex 1407 and the British would advance to hex 1507.

Victory Conditions

As the campaign has developed I can see that the original victory conditions I set are a bit vague and it's unlikely either side could achieve them so I am reformulating them as follows:

The campaign progresses until one side has 20VP more than the other. VPs are awarded as below:

2VP for each enemy infantry unit permanently destroyed (1VP to the Boers for destroying the Lancers, Naval Brigade detachment or Imperial Light Horse)
1VP for each artillery battery, maxim gun or pom-pom destroyed (1 extra VP if the battery is the Long Tom or 4.7" Naval Gun).
1VP for each named commander who becomes a casualty
5VP for each battle won
5VP to the Boers for occupying Harrismith or Helpmakaar
1VP to the Boers for each turn they lay siege to Ladysmith
10VP to the Boers for occupying Ladysmith

On this basis the current VP totals are as follows:

British = 5VP
Boers = 13VP

The Boers are currently in the lead with +8VP

Tuesday 7 November 2023

Biggarsberg Pass - The Game

The British column approaches the Biggarsberg Pass blissfully unaware that the Boers are waiting for them hidden in the hills.
The Boers are holding their fire waiting for the Tommies to come on.

The men of the Piet Retief Commando raise their rifles in anticipation.

On and on come the British...

...into the valley of death.

Turn 3 and finally the Boers let rip - 15 of the King's Royal Rifles are laid low!

The leading artillery and the King's Liverpool take a few hits too but not to the same degree.

Caught between the fire of the Piet Retief and Vryheid Commandos the head of the column ceases to exist.

But the remainder of the British force are able to deploy and begin to return fire.

The 'first time under shrapnel fire' rule causes 5 Boers of the Piet Retief Commando to flee whilst a sixth is knocked down. This is a lucky break for the British. 

A similar fate befalls the Vryheid Commando.

The British are still taking casualties but are not near their break point yet. 

The Piet Retief Commando withdraw from their exposed position (I diced to see whether they would remain in position or fall back as they were very near their break point) relieving the pressure on the British line. 

The Utrecht Commando (foreground) had so far only engaged in some long distance rifle fire.

Another hit on the Vryheid Commando was enough to see them take to their ponies and flee. If one more Boer Commando breaks the game will be over.

And yep, as the Piet Retief reach the hill they too are reduced (break point is 5 figures) by further British artillery fire.

Incredibly it's a British victory - I bet you didn't see that coming?

So Yule gets away by the skin of his teeth and the column is free to withdraw through the pass. His own brigade however has now been shattered leaving only Hamilton's as an effective fighting force.

Next I will calculate casualty recovery.