Buller arrived in South Africa in October 1899 bringing much
needed reinforcements of British troops. Having instructed Methuen to press
forward towards Kimberley he personally took direct control of the effort to relieve
Ladysmith. As he advanced the Boers fell back across the Tugela River near
Colenso.
The Boer position at Colenso was reported to be very strong and
Buller sensibly decided to try to bypass it rather than attack head-on.
However, following the news of the British defeats at Stormberg and
Magersfontein, he felt under pressure to mount a direct assault.
The attack was ordered for dawn on 15th December 1899 with an
initial advance by Hart’s Brigade on the left that ended in disaster when his
men were funnelled into a dead-end loop of the Tugela and shot down by the
Boers. Things went slightly better on the far right of the field but in the
centre, Colonel Long took it upon himself to advance his guns far too close to
the Boer positions where the crews were cut down by rifle fire.
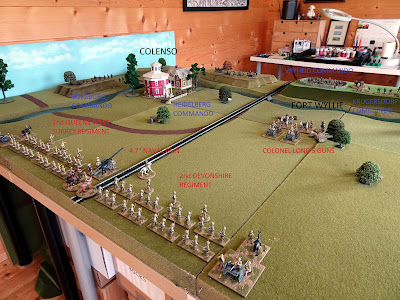
Hildyard’s Brigade was ordered to advance, take
Colenso and force a crossing of the Tugela. He was also tasked with supporting
Long in his exposed position. This scenario focusses on that part of the
battle.
Special Rules
1. The Boers were instructed by Botha to hold their
fire until the British were committed to an attack. Rule: No British units may
fire until after the Boers have fired for the first time.
2. The river could only be crossed at
Colenso bridge and at the drift by the destroyed railway bridge. Rule: Troops
may cross the bridge and drift 3 figures abreast and count as being in close
order when doing so.
3. The Boer’s morale
was fragile during the actual battle and the garrison at Colenso withdrew
without really contesting the place. Rule: The Boers defending Colenso must
test for morale each turn even if they do not receive casualties.
4. In the
actual battle Major Long advanced the 14th and 66th Field Batteries in advance of
the infantry to a position just in front of Fort Wyllie where the crews were
subsequently wiped out and most the guns lost. Rule: The guns may not be
withdrawn but if all the crewmen become casualties the British must attempt to
extract the guns. Lieutenant Roberts is sent forward with two limbers each with
a strength value of 6 to retrieve as many of the guns as possible. Any guns not
retrieved are captured by the Boers.
5. In the actual battle the Boers laid
explosive at the bridge with the idea of trapping the British on their side of
the river and capturing them. Rule: to blow the bridge the Boers must roll a 5
or 6.
Order of Battle
British C in C General Sir Redvers Buller
2nd Brigade (Major-General Hildyard)
2nd Queens West Surrey Regiment
2nd Devonshire
Regiment
2nd West Yorkshire Regiment (enter turn 3)
2nd East Surrey Regiment (enter turn 3)
2 x Maxim Guns
Colonel
Long
2 x Batteries Royal Field Artillery (14th & 66th batteries)
4.7” Naval
Battery
Boers C in C General Botha
Boksburg Commando
Heidelberg
Commando
Vryheid Commando
Krugersdorp Commando
2 x Field Artillery
1 x Pom Pom
Victory Conditions
This is a timed scenario, at the end
of turn 8 calculate VPs as follows:
British
For each Boer Commando destroyed or
currently fleeing 5VP
If British infantry are across the Tugela 5VP
Boers
If the Boers still hold Colenso 5VP
For
each British infantry regiment destroyed 5VP
For each British gun captured 1VP


Do the Boers just get the one attempt to blow the bridge or can they keep trying?
ReplyDeleteI was thinking they can roll each turn but only after the Boers have withdrawn from Colenso.
DeleteI am wincing already...
ReplyDeleteWhat can possibly go wrong?
DeleteAn challenging little scenario Ian…
ReplyDeleteAs you say… what can possibly go wrong.
All the best. Aly
Thanks Aly, I'm hoping I have managed to achieve a bit of balance in the scenario but we will see!
DeleteI think I'll close my eyes while I'm watching...
ReplyDeleteI'll be crossing my fingers for the British...
DeleteEverything looks great Ian! It will be interesting to see how your battle turns out compared to the real thing! You never know!
ReplyDeleteI won't have time to play the game until next week and then we'll see!
DeleteHi Ian. Did this battle happen? It looked very interesting.
ReplyDeleteHi Bob, yes it did just click on the next post!
Delete