Friday, 14 August 2026

Zoutpans Campaign Rules

 
Intelligence
The Boers have full knowledge of the British strength and deployments unless, at the start of a turn, they roll a 1 in which case they may only act on the previous information received. The British must dice each turn to see what intelligence reports they receive. Roll 1 D6 for each separate Boer map force:

1, 2 or 3 = enemy not detected
4 = enemy is detected but no information available on direction of movement
5 = enemy location and direction of movement reported
6 = enemy location, direction and strength reported
 
+1 to the die roll if the enemy force was detected in the previous turn.
-1 to the die roll if the British troops closest to the Boer force are led by a C or D rated commander.

The British may only detect Boer forces up to a maximum distance of 10 miles.

Initial Deployment
The AI will make the Boer initial deployments. The British will begin concentrated at Steenkampsdrift.


Orders
Initial orders for each force are issued at the start of the campaign in line with the strategy that is being followed. To send new orders in response to intelligence received the C-in-C must pass a command die roll.
 
The British command die roll required is 4, 5 or 6. Add one to the die roll if the commander is A or B rated (A commander may make 1 reroll) and minus one if he is D rated.
The Boer command die roll required is 3, 4, 5 or 6. Add one to the die roll if the commander is A or B rated (A commander may make 1 reroll) and minus one if he is D rated.
 A rated commanders may use their own initiative and change their orders without waiting for new orders from the C-in-C although they still need to pass a command die roll.
 
The issuing of orders to the Boer forces will be made by a combination of die rolls and AI decisions.


Leader Ratings
Leaders are rated from A to D where A is the highest rating.
 
Movement
Boer Forces – die roll 1 or 2 = 5 miles, 3, 4 or 5 = 10 miles, 6 = 15 miles
British Mounted Forces – die roll 1 = no movement, 2 or 3 = 5 miles, 4, 5 or 6 = 10 miles
British Forces – marching along railway line die roll 1 = no movement, 2, 3 or 4 = 5 miles, 6 = 10 miles
British Forces – marching along road die roll 1 or 2 = no movement, 3 or 4 = 3 miles, 5 = 5 miles, 6 = 7 miles
No forces may enter mountainous terrain except where it is crossed by a road or railway.
No forces may cross a river except where one is crossed by a road or railway.
 
Battles
When a contact occurs, make a list (1 to 6) of possible actions, and use a D6 to decide which of them is taken. Any resulting battle will then be fought on the table top. After the battle I’ll use the same system to decide how the result affects subsequent actions of both sides.
Only A rated British commanders may operate troops in extended order.
 
Recovery after Battle
After each engagement casualties are restored by rolling 1 D6 per lost figure as follows:
 
British Troops – 4, 5 or 6
British troops routed off table or otherwise removed – 3, 4, 5, or 6
British Artillery – no recovery
Boers – 4, 5 or 6
Boers who fled – 3, 4, 5 or 6
Boer Artillery – no recovery
Fallen Officers – for each officer casualty roll 1 D6, 1 – 4 officer has been killed or injured and will be replaced. 5 or 6 just a scratch and the officer returns to his command.

Friday, 7 August 2026

Zoutpans Campaign - Scenario

I asked ChatGPT to make some small amendments to the campaign map, the main one being to reduce the scale so that the map now represents an area approximately 50 x 50 miles which is more manageable for the sort of game I want to play. I have discovered that the AI is not that good at editing a map as it tends to make other little changes you never asked for that can be hard to spot. However, here is the final version of the Campaign Zoutpans map.

Next I fed the AI some criteria for the campaign objectives and asked it to write them up. Initially I received a three page detailed document on strategy, tactics and objectives but this was a bit too much so I asked for versions for each side of no more than 150 words. First the British:

WAR OFFICE — CONFIDENTIAL

London, November 1899

To: General Sir Alistair C. Wetherby, K.C.B.

By direction of the Secretary of State for War, you are instructed to undertake operations against the Boer forces under Commandant-General Hendrik Jacobus van Rensburg in the Zoutpans District.

Your principal object is the defeat and dispersion of the Boer Field Army, thereby preventing it from continuing to threaten British interests and communications in the region.

You will secure the mining towns of Dwaalfontein and Rooipoort, together with the railway connecting these places with Grootlaagte and Steenkampsdrift. Particular care is to be taken to protect the railway, telegraph and other essential communications.

Following the destruction or sufficient disorganisation of the Boer forces, you will advance upon and capture Zoutpansberg, the seat of the Boer administration.

The enemy's mobility and knowledge of the country must be anticipated. You are therefore granted discretion as to the conduct of operations, but the destruction of the Boer military organisation remains your paramount objective.

By Order of the Secretary of State for War

Now the Boers:

GENERAL HEADQUARTERS — ZUID-AFRIKAANSCHE REPUBLIEK

Zoutpansberg, November 1899
CONFIDENTIAL

To: Commandant-General Hendrik Jacobus van Rensburg

You are directed to conduct the defence of the Zoutpans District against the advancing British forces under General Sir Alistair C. Wetherby.

Your principal object is to preserve the Boer Field Army as an effective fighting force, while preventing the British from securing the railway and the principal settlements.

Every effort is to be made to delay and harass the enemy's advance, employing the mobility of the commandos and the broken country to advantage. The mining towns of Dwaalfontein and Rooipoort are to be denied to the enemy for as long as practicable, and the railway is to be disrupted wherever opportunity permits.

The British must be prevented from establishing a secure line of communication between Grootlaagte and Steenkampsdrift.

You will avoid decisive action when the enemy is strongly concentrated, but strike vigorously against isolated columns, communications and detachments.

Above all, the Long Tom and the commandos must be preserved.

Should circumstances permit, the British advance is to be turned into a costly and protracted campaign, until the enemy is compelled to abandon his attempt upon Zoutpansberg.

By Order of the Government of the Zuid-Afrikaansche Republiek

So this all helps me to focus on the way the two armies should behave and using the AI is already taking things out of my hands by giving me some objectives I hadn't considered. In the next post I'll move on to the campaign rules.

Sunday, 2 August 2026

Zoutpans Campaign - Boer Forces

The Boers will be defending their home turf in this campaign so they will need an experienced and determined leader. Commandant-General Henrick Jacobus Van Rensburg is just such a man.

The following is a breakdown of the troops under his command:

Headquarters Zuid-Afrikaansche Republiek Field Army
Commander-in-Chief
Commandant-General Hendrik Jacobus van Rensburg
Heavy Artillery
Long Tom (One 155mm Creusot Gun) - Captain Cornelius Frederik Celliers

Northern Field Force
General Pieter Stephanus du Toit
Brakspruit Commando - Commandant Andries Jacobus Bothma
Klipfontein Commando - Commandant Petrus Daniel Smit
Doornkop Commando - Commandant Jacobus Hendrik Kruger
Rietkuil Commando - Commandant Hermanus Frederik Pretorius
Elandsberg Commando - Commandant Dirk Cornelis Venter
Witkrans Commando - Commandant Carel Johannes Botha
1st Staatsartillerie Battery - Captain Jacobus Frederik Wolmarans
2nd Staatsartillerie Battery - Captain Pieter Hendrik Louw
1st Pom-Pom Section - Lieutenant Gideon Alberts
2nd Pom-Pom Section - Lieutenant Jan Christoffel Swanepoel

Southern Field Force
General Christiaan Johannes Viljoen
Vlakfontein Commando - Commandant Michiel Johannes Coetzee
Zwartkop Commando - Commandant Stephanus Willem Joubert
Welgevonden Commando - Commandant Nicolaas Gert van der Merwe
Blesboklaagte Commando - Commandant Johannes Petrus Erasmus
Roodepoort Commando - Commandant Frans Jacobus de Beer
Buffelshoek Commando - Commandant Willem Hendrik Boshoff
3rd Staatsartillerie Battery - Captain Nicolaas Johannes Grobler
4th Staatsartillerie Battery - Captain Hendrik Stephanus Nel
3rd Pom-Pom Section - Lieutenant Louis Jacob Marais
4th Pom-Pom Section - Lieutenant Barend Johannes Labuschagne

So the forces are all sorted out next I'll move on to creating the scenario.

Thursday, 30 July 2026

Zoutpans Campaign - British Forces

As the campaign is to be fictional I thought it would be a bit of fun to get ChatGPT to create a fictional order of battle along with commanders. The British force will be led by General Sir Alistair C. Wetherby KCB.

Here is the detailed order of battle of the troops under General Wetherby's command:

Army Headquarters
Commander-in-Chief
General Sir Alistair C Wetherby, KCB
Chief of Staff
Major-General Henry L. Markham

1st Brigade
Brigadier-General Charles F Hawthorn
1st Rutlandshire Regiment - Colonel Sir Reginald Pemberton
1st North Mercian Regiment - Colonel William Ashford
1st South Wessex Regiment - Colonel George Ravenscroft
56th Battery RFA - Major Edgar H. Sinclair
70th Battery RFA - Major Richard M. Forsyth
No1 Maxim Gun Detachment - Lieutenant Edward P. Langford

2nd Brigade
Brigadier-General Edward M. Ashcombe
1st East March Regiment - Colonel Frederick Lonsdale
1st Bordershire Regiment - Colonel Hugh Canning
1st Fenland Regiment - Colonel Percival Strickland
19th Battery RFA - Major Charles W. Beresford
27th Battery RFA - Major Lionel P. Ashcombe
No2 Maxim Gun Detachment - Lieutenant Frederick J. Calthorpe

3rd (Guards) Brigade
Brigadier-General Sir Lionel Ashburton, KCVO
King's Guards - Colonel Sir Julian Fairfax
Queen Victoria's Guards - Colonel Algernon St. John
29th Battery RFA - Major Frederick G. Carrington
No3 Maxim Gun Detachment - Captain Arthur B. Mowbray

4th (Highland) Brigade
Brigadier-General Fergus MacLeod
1st Strathmore Highlanders - Colonel Malcolm MacNair
1st Braemar Highland Rifles - Colonel Euan Campbell
81st Battery RFA - Major Harold T. Wyndham
No4 Maxim Gun Detachment - Lieutenant Hamish MacDougall

Mounted Brigade
Brigadier-General Arthur G. Lennox
11th Royal Lancers - Colonel Charles Montgomery
Imperial Volunteer Horse - Lieutenant-Colonel Cyril A. Pembroke

Naval Brigade
Naval Brigade Landing Party - Commander William H. Ashburn RN
1st Naval Heavy Battery - Commander Edward H. Somerset RN

I also asked the AI to create a brief description of each commander and to rate them all as either below average, average, above average, or exceptional. This kind of background detail all goes to flesh out the bones of a solo campaign to make it more engaging.

Saturday, 25 July 2026

Zoutpans Campaign

I'm very aware that it's two and half years since I last played a game with my Boer War troops. This seems like way too long so I'm intending to do something about it before the end of the year. I enjoyed my last solo campaign and have an idea for another one. This time it will be set in the fictitious Zoutpans District of the Transvaal.

The map is AI generated and should provide a good basis for a campaign. All I need to do now is to put together orders of battle for both sides and then get playing.

Saturday, 1 June 2024

Argyll & Sutherland Highlanders

We had a trip to Stirling castle today, never been before and I highly recommend it - it's a much bigger site than I thought and you could easily lose four or so hours there. The castle is the home of the Regimental Museum of the Argyll & Sutherland Highlanders and this monument to the men who fell in the Boer War is right by the entrance.

No Boer wargaming going on at the moment but I hope to return to it in the autumn.


Friday, 26 January 2024

Time for a Parade

While the troops catch a bit of a breather I thought it might be a good time for a parade. First up the Boers.


The army totals 95 pieces. They are a mixture of Newline Designs, Jacklex, Raventhorpe Miniatures, Strelets and Scruby. They have all been painted by me except for the Scruby figures donated by Ross. There are:

4 x 13 Commandos (foot)
1 x 13 Commando (mounted)
2 x Field Guns
2 x Pom Poms
1 x Long Tom
1 x Wagon
2 x Command Stands

And now the Soldiers of the Queen...


The army totals 259 pieces. They are a mixture of Newline Designs, Jacklex and Raventhorpe Miniatures. They have all been painted by me except for the cavalry and the firing 'Guardsmen' painted by Matt G. There are:

6 x 27 Infantry Battalions
2 x 13 Half-Battalions
1 x 13 Lancers
4 x Field Guns
2 x Limbers
1 x 4.7" Naval Gun
2 x Maxim Guns
5 x Command Stands

Take a bow lads!


Tuesday, 23 January 2024

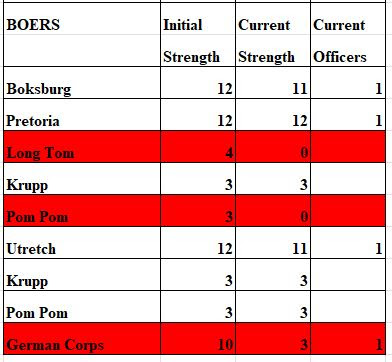
Dannhauser - The Aftermath

The British lost a total of 45 figures during the battle which was quite a way under their break-point of 67. The losses to the Boers, whilst smaller, are probably more critical including the Long Tom and a Pom-Pom wiped out. The breakdown of casualties is given below:


I carried out die rolls for casualty recovery and then redistributed figures from disbanded units to other units as follows:

9 figures from the King's Liverpool were added to the Gloucesters and the remaining 6 to the Manchesters.
3 figures from the German Corps were added to the Boksburg Commando.

Having totted up all the VPs for both sides incredibly it stands at a draw of 15VPs each!

I hope to return to the campaign in the future but for the moment I will be taking a break. Thanks for your interest and all the comments as these really do help motivate me in a solo project like this.

GOD SAVE THE QUEEN!

Monday, 22 January 2024

Battle of Dannhauser - Part 2


Turn 3 and the Boksburg Commando come under shrapnel fire for the first time. Their 'flee' test saw the maximum 6 figures take to their ponies and together with casualties this reduced them to break-point. One Commando down two more to go!
Heartened by events French pushes forward urging the Manchester's on.

Meanwhile White's command fails to activate for a third turn although they are taking a steady stream of casualties.

The two British Brigades that have managed to activate are gradually closing the distance with the Boer lines.

At the foot of the kopje the Manchester's come under heavy fire that forces them to stop and lie down.

Hamilton's Brigade are also out of steam and have ground to a halt.

But on the plus side the Naval Gun and British field artillery have knocked out both Long Tom and one of the pom-poms.

The Utretch Commando are reduced to break-point and withdraw. Two Commandos down and one to go.

Although reduced in strength Hamilton's men are hanging in there and delivering withering rifle fire back at the Boers.

The Black Watch have now passed through the prone ranks of the Manchester's and are within striking distance of the Boers atop the kopje.

A round of firing from the German Corps fails to inflict any PINs on the Black Watch.

And then it happens! The Commandant of the Pretoria Commando fails his 'fallen leader' test by rolling a 1. Because their Commandant is down the whole Commando must take a special morale test - another 1 will see them all flee, well you guessed it! Three Commando's down and a British victory.

As French's men were so close I couldn't resist playing the Melee phase of the next turn and a die roll of 6 meant a spectacular bayonet charge by the Black Watch cleared the kopje of the enemy.

A great victory for the British although you have to feel a bit sorry for the lads in White's command who failed five activation die rolls. 


Sunday, 14 January 2024

Battle of Dannhauser - Part 1

I had some time this afternoon to play the first two turns of the game and it is shaping up to be a good one. Here's what's happened so far:

Hamilton and French both activated their brigades on turn one and moved forward allowing the supporting off-table regiments to come on. They immediately came under fire as the Boers let rip with everything they had.
White's own brigade failed to activate so could only stand where they were and take it.

The Gloucester's paid a heavy price for being the lead unit of Hamilton's brigade as the men fell under fire from rifles, artillery and the dreaded pom-pom's.

One bit of luck for the British - Long Tom fired at the 4.7" Naval gun rolling 10 dice needing a 5 or 6 to hit and not a single one was successful!

The Pretoria Commando on the kopje were able to fire over the heads of the Boksburg Burgers in the trenches below adding double the weight of fire on Hamilton's line.

Turn two and the British artillery zeroed in on Long Tom and some excellent shooting reduced the gun's strength to just 1SP - one more hit and it will be out of action.

White's men failed to activate again but at least they could shoot. Some good dice rolls plus supporting fire from the 18th Field Battery killed 2 Boers of the Utrecht Commando and forced 2 more to flee.

The Manchester's leading French's brigade were forced to check morale and the Major-General put himself at risk to stop them picking up a PIN marker. Fortunately he survived the Fallen Leader test.

The situation at the end of Turn 2. French and Hamilton are making progress but the casualties are starting to mount particularly in Hamilton's already depleted command.

I'll keep you posted on developments.

Tuesday, 9 January 2024

Dannhauser - Scenario

The main reason behind playing out this solo campaign is to come up with a context for game scenarios that I would never normally dream up. As the campaign has progressed things have started to take a life of their own and all the events so far have been building towards this major clash between the two opposing main forces.

Winning this battle will be vital for either side. A win for the Boers could conceivably see them achieving a campaign victory, a win for the British will turn the tide and pull them back from the brink of defeat.

The Battle of Dannhauser - British on the left, Boers on the right. The town of Dannhauser is just off table behind the Boer right flank.
The British deployment. The King's Liverpool Regiment is off table behind the Gloucestershire Regiment. The Black Watch are off table behind the Manchester Regiment.

The Boer deployment. The Boers had a choice of units to field but some of the full-strength commandos had never been in action before. In the end I opted to field just one 'green' unit and the under-strength German Corps to help stiffen morale.

Special Rules

1. In order to commence advancing each British brigade commander must pass a command die roll. For White this is a 5 or 6 and for Hamilton and French a 3,4,5 or 6.
2. A further command die roll is made to see whether the regiments of each brigade are able to deploy in extended order (Hamilton's brigade will automatically deploy in extended order).
3. Hamilton's regiments will be classified as elite for this game as they have already taken part in two battles.
4. Hamilton's field officers will use the standard 'fallen officer' rule but as all other units have not seen combat yet they will +1 to all fallen officer die rolls.
5. The Boksburg commando has not been in action before and will be subject to the 'first time under shrapnel fire' morale rule.

The 5th Lancers finally make it on to the table.

Order of Battle

British
C-in-C Lieutenant-General Sir George White
5th Lancers
2nd Gordon Highlanders
18th Field Artillery
Maxim Gun
Naval Brigade Detachment
4.7" Naval Gun
Major-General John French
1st Manchester Regiment
1st Black Watch
42nd Field Artillery
Maxim Gun
Colonel Ian Hamilton
1st King's Liverpool Regiment (elite, strength 18 figures)
1st Gloucestershire Regiment (elite, strength 20 figures)
69th Field Artillery

Boers
C-in-C General Piet Joubert
Boksburg Commando (green)
Pretoria Commando
Long Tom
Krupp Field Gun
Pom Pom
General Lucas Meyer
Utrecht Commando
Krupp Field Gun
Pom Pom
General Johannes Kock
German Corps (strength 10 figures)

Long Tom is here, I'm already nervous...

Victory Conditions
To win the British must force three Boer commandos to flee. The British will lose if they receive over 67 casualties (50%).

Friday, 29 December 2023

26 October 1899 - Turn 9

Orders

White's force at Glencoe will advance and attack the enemy at Dannhauser,
Yule will remain at Ladysmith.
Penn Symons will remain at Helpmakaar.

Joubert, Kock and Meyer will remain at Dannhauser.
De Wet and Botha will again attempt to attack Ladysmith but will now require a 5 or 6 die roll to succeed.

Movement

White rolls a 6 (which is a 3 hex move) and arrives at Hatting Spruit mid-morning. Full of enthusiasm, he orders an immediate attack on the Boers who have occupied two kopjes south of Dannhauser and to the east of the railway line.

Men of the Naval Detachment crossing the Ngobiya River at Hatting Spruit. Both sides will have their 'big guns' in the coming action.

De Wet rolls a 3 and fails to attack Ladysmith.

The situation at mid-morning on turn 9.


We will have a battle at Dannhauser!